In android, TextView is a user interface control that is used to set and display the text to the user based on our requirements. The TextView control will act as like label control and it won’t allow users to edit the text.
In android, we can create a TextView control in two ways either in XML layout file or create it in Activity file programmatically.
Following is the sample way to define TextView control in XML layout file in android application.
<?xml version="1.0" encoding="utf-8"?>
<LinearLayout xmlns:android="http://schemas.android.com/apk/res/android"
android:layout_width="match_parent"
android:layout_height="match_parent"
android:orientation="vertical">
<TextView
android:id="@+id/textView1"
android:layout_width="match_parent"
android:layout_height="wrap_content"
android:layout_marginBottom="10dp"
android:text="Welcome to Tutlane"
android:textColor="#86AD33"
android:textSize="20dp"
android:textStyle="bold" />
</LinearLayout>
If you observe above code snippet, here we defined a TextView control in xml layout file to display the text in android application.
In android, we can create a TextView control programmatically in an activity file based on our requirements.
Following is the example of creating a TextView control dynamically in an activity file.
public class MainActivity extends AppCompatActivity {
@Override
protected void onCreate(Bundle savedInstanceState) {
super.onCreate(savedInstanceState);
setContentView(R.layout.activity_main);
LinearLayout linearLayout = (LinearLayout) findViewById(R.id.linearlayout);
TextView textView = new TextView(this);
textView.setText("Welcome to Tutlane");
linearLayout.addView(textView);
}
}
In android, we can set the text of TextView control either while declaring it in Layout file or by using setText() method in Activity file.
Following is the example to set the text of TextView control while declaring it in the XML Layout file.
If you observe above example we used android:text property to the set required text for TextView control in XML Layout file.
Following is another way to set the text of textview control programmatically in activity file using setText() method.
TextView tv = (TextView)findViewById(R.id.textView1);
tv.setText("Welcome to Tutlane");
If you observe above code snippet, we are getting the TextView control which we defined in XML layout file using id property and setting the text using setText() method.
The following are some of the commonly used attributes related to TextView control in android applications.
| Attribute | Description |
|---|---|
| android: id | It is used to uniquely identify the control |
| android:autoLink | It will automatically found and convert URLs and email addresses as clickable links. |
| android: ems | It is used to make the textview be exactly this many ems wide. |
| android:hint | It is used to display the hint text when text is empty |
| android:width | It makes the TextView be exactly this many pixels wide. |
| android:height | It makes the TextView be exactly this many pixels tall. |
| android:text | It is used to display the text. |
| android:textColor | It is used to change the color of the text. |
| android:gravity | It is used to specify how to align the text by the view's x and y-axis. |
| android:maxWidth | It is used to make the TextView be at most this many pixels wide. |
| android:minWidth | It is used to make the TextView be at least this many pixels wide. |
| android:textSize | It is used to specify the size of the text. |
| android:textStyle | It is used to change the style (bold, italic, bolditalic) of text. |
| android:textAllCaps | It is used to present the text in all CAPS |
| android:typeface | It is used to specify the Typeface (normal, sans, serif, monospace) for the text. |
| android:textColor | It is used to change the color of the text. |
| android:textColorHighlight | It is used to change the color of text selection highlight. |
| android:textColorLink | It is used to change the text color of links. |
| android:inputType | It is used to specify the type of text being placed in text fields. |
| android:fontFamily | It is used to specify the fontFamily for the text. |
| android:editable | If we set, it specifies that this TextView has an input method. |
Following is the example of using TextView control in the android application.
Create a new android application using android studio and give names as TextViewExample. In case if you are not aware of creating an app in android studio check this article Android Hello World App.
Now open an activity_main.xml file from \res\layout path and write the code like as shown below
<?xml version="1.0" encoding="utf-8"?>
<LinearLayout xmlns:android="http://schemas.android.com/apk/res/android"
android:layout_width="match_parent"
android:layout_height="match_parent"
android:layout_marginTop="10dp"
android:orientation="vertical"
android:padding="10dp">
<TextView
android:id="@+id/textView1"
android:layout_width="match_parent"
android:layout_height="wrap_content"
android:layout_marginBottom="10dp"
android:text="Welcome to Tutlane"
android:textColor="#86AD33"
android:textSize="20dp"
android:textStyle="bold" />
<TextView
android:id="@+id/textView2"
android:layout_width="wrap_content"
android:layout_height="wrap_content"
android:layout_marginBottom="15dp"
android:textAllCaps="true" />
<TextView
android:id="@+id/textView3"
android:layout_width="wrap_content"
android:layout_height="wrap_content"
android:text="Welcome to Tutlane"
android:textStyle="bold"
android:textColor="#fff"
android:background="#7F3AB5"
android:layout_marginBottom="15dp"/>
<TextView
android:id="@+id/textView4"
android:layout_width="wrap_content"
android:layout_height="wrap_content"
android:autoLink="email|web"
android:text="For more details visit http://tutlane.com and send mail to support@tutlane.com" />
</LinearLayout>
Once we are done with creation of layout with required controls, we need to load the XML layout resource from our activity onCreate() callback method, for that open main activity file MainActivity.java from \java\com.tutlane.textviewexample path and write the code like as shown below.
package com.tutlane.textviewexample;
import android.support.v7.app.AppCompatActivity;
import android.os.Bundle;
import android.widget.TextView;
public class MainActivity extends AppCompatActivity {
@Override
protected void onCreate(Bundle savedInstanceState) {
super.onCreate(savedInstanceState);
setContentView(R.layout.activity_main);
TextView tv = (TextView)findViewById(R.id.textView2);
tv.setText("Welcome to Tutlane");
}
}
If you observe above code we are calling our layout using setContentView method in the form of R.layout.layout_file_name. Here our xml file name is activity_main.xml so we used file name activity_main and we are setting text to one of our TextView control (textView2) in our activity file.
Generally, during the launch of our activity, the onCreate() callback method will be called by the android framework to get the required layout for an activity.
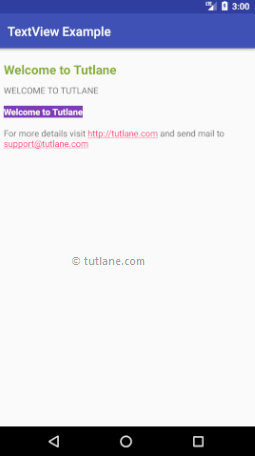
When we run the above example using the android virtual device (AVD) we will get a result like as shown below.
This is how we can use TextView control in android applications to set and display the text based on our requirements.