In android, Dialog is a small window that prompt messages to the user to make a decision or enter additional details. Generally, the Dialogs are used with modals event and these useful to prompt users to perform a particular action to proceed further in the application.
Following is the pictorial representation of using dialogs in android applications.
In android, we have a different type of Dialogs available, those are
| Dialog | Description |
|---|---|
| AlertDialog | This dialog is used to display prompt to the user with title, upto three buttons, list of selectable items or a custom layout. |
| DatePickerDialog | This dialog is a predefined UI control and it allows a user to select Date. |
| TimePickerDialog | It’s a predefined UI control and it allows a user to select Time. |
In previous chapters, we covered DatePickerDialog and TimePickerDialog, now we will see how to use AlertDialog in our android applications with examples.
In android, AlertDialog is used to prompt a dialog to the user with messages and buttons to perform an action to proceed further.
The AlertDialog in an android application will contain three regions like as shown below.

In android Alert Dialogs, we can show a title, up to three buttons, a list of selectable items or a custom layout based on our requirements.
| Region | Description |
|---|---|
| Title | It’s optional and it can be used to show the detailed messages based on our requirements. |
| Content Area | It is used to display a message, list or other custom layouts based on our requirements. |
| Action Buttons | It is used to display action buttons to interact with users. We can use upto 3 different action buttons in alert dialogs, such as positive, negative and neutral. |
Generally, in android we can build AlertDialog in our activity file using different dialog methods.
Following are the some of commonly used methods related to AlertDialog control to built alert prompt in android applications.
| Method | Description |
|---|---|
| setTitle() | It is used to set the title of alertdialog and its an optional component. |
| setIcon() | It is used to set the icon before the title |
| setMessage() | It is used to set the message required message to display in alertdialog. |
| setCancelable() | It is used to allow users to cancel alertdialog by clicking on outside of dialog area by setting true/false. |
| setPositiveButton() | It is used to set the positive button for alertdialog and we can implement click event of a positive button. |
| setNegativeButton() | It is used to set the negative button for alertdialog and we can implement click event of a negative button. |
| setNeutralButton() | It is used to set the neutral button for alertdialog and we can implement click event of a neutral button. |
Following is the example of defining a one Button control in RelativeLayout to show the AlertDialog and get the action that was performed by a user on Button click in the android application.
Create a new android application using android studio and give names as AlertDialogExample. In case if you are not aware of creating an app in android studio check this article Android Hello World App.
Now open an activity_main.xml file from \res\layout path and write the code like as shown below
<?xml version="1.0" encoding="utf-8"?>
<RelativeLayout xmlns:android="http://schemas.android.com/apk/res/android"
android:layout_width="match_parent" android:layout_height="match_parent">
<Button
android:id="@+id/getBtn"
android:layout_width="wrap_content"
android:layout_height="wrap_content"
android:layout_marginLeft="150dp"
android:layout_marginTop="200dp"
android:text="Show Alert" />
</RelativeLayout>
If you observe above code we defined a one Button control in RelativeLayout to show the alert dialog on Button click in XML layout file.
Once we are done with the creation of layout with required controls, we need to load the XML layout resource from our activity onCreate() callback method, for that open main activity file MainActivity.java from \java\com.tutlane.alertdialogexample path and write the code like as shown below.
package com.tutlane.alertdialogexample;
import android.content.DialogInterface;
import android.support.v7.app.AlertDialog;
import android.support.v7.app.AppCompatActivity;
import android.os.Bundle;
import android.view.View;
import android.widget.Button;
import android.widget.Toast;
public class MainActivity extends AppCompatActivity {
@Override
protected void onCreate(Bundle savedInstanceState) {
super.onCreate(savedInstanceState);
setContentView(R.layout.activity_main);
Button btn = (Button)findViewById(R.id.getBtn);
btn.setOnClickListener(new View.OnClickListener() {
@Override
public void onClick(View v) {
AlertDialog.Builder builder = new AlertDialog.Builder(MainActivity.this);
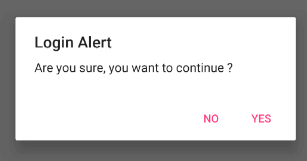
builder.setTitle("Login Alert")
.setMessage("Are you sure, you want to continue ?")
.setCancelable(false)
.setPositiveButton("Yes", new DialogInterface.OnClickListener() {
@Override
public void onClick(DialogInterface dialog, int which) {
Toast.makeText(MainActivity.this,"Selected Option: YES",Toast.LENGTH_SHORT).show();
}
})
.setNegativeButton("No", new DialogInterface.OnClickListener() {
@Override
public void onClick(DialogInterface dialog, int which) {
Toast.makeText(MainActivity.this,"Selected Option: No",Toast.LENGTH_SHORT).show();
}
});
//Creating dialog box
AlertDialog dialog = builder.create();
dialog.show();
}
});
}
}
If you observe above code we are calling our layout using setContentView method in the form of R.layout.layout_file_name in our activity file. Here our xml file name is activity_main.xml so we used file name activity_main and we are trying to show the AlertDialog on Button click.
Generally, during the launch of our activity, onCreate() callback method will be called by android framework to get the required layout for an activity.
When we run the above example using the android virtual device (AVD) we will get a result like as shown below.
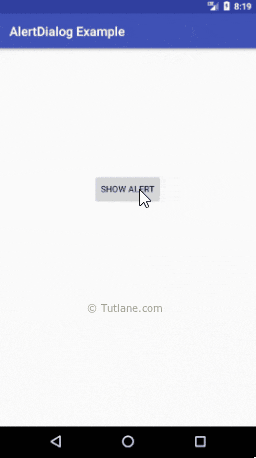
This is how we can use AlertDialog control in android applications to show the alert dialog in android applications based on our requirements.
In android, we can show the list of items in AlertDialog based on our requirements like as shown below.
There are three different kinds of lists available with AlertDialogs in android, those are
Now we will see how to use Single Choice List with Checkboxes in android application to show the list of items with checkboxes in AlertDialog and get selected item values with examples.
Create a new android application using android studio and give names as AlertDialogExample. In case if you are not aware of creating an app in android studio check this article Android Hello World App.
Now open an activity_main.xml file from \res\layout path and write the code like as shown below
<?xml version="1.0" encoding="utf-8"?>
<RelativeLayout xmlns:android="http://schemas.android.com/apk/res/android"
android:layout_width="match_parent" android:layout_height="match_parent">
<Button
android:id="@+id/getBtn"
android:layout_width="wrap_content"
android:layout_height="wrap_content"
android:layout_marginLeft="150dp"
android:layout_marginTop="200dp"
android:text="Show Alert" />
</RelativeLayout>
If you observe above code we defined a one Button control in RelativeLayout to show the alert dialog on Button click in XML layout file.
Once we are done with the creation of layout with required controls, we need to load the XML layout resource from our activity onCreate() callback method, for that open main activity file MainActivity.java from \java\com.tutlane.alertdialogexample path and write the code like as shown below.
package com.tutlane.alertdialogexample;
import android.content.DialogInterface;
import android.support.v7.app.AlertDialog;
import android.support.v7.app.AppCompatActivity;
import android.os.Bundle;
import android.view.View;
import android.widget.Button;
import android.widget.Toast;
import java.util.ArrayList;
public class MainActivity extends AppCompatActivity {
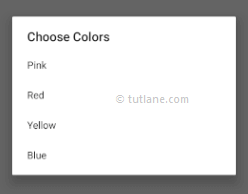
final CharSequence[] colors = { "Pink", "Red", "Yellow", "Blue" };
ArrayList<Integer> slist = new ArrayList();
boolean icount[] = new boolean[colors.length];
String msg ="";
@Override
protected void onCreate(Bundle savedInstanceState) {
super.onCreate(savedInstanceState);
setContentView(R.layout.activity_main);
Button btn = (Button)findViewById(R.id.getBtn);
btn.setOnClickListener(new View.OnClickListener() {
@Override
public void onClick(View v) {
AlertDialog.Builder builder = new AlertDialog.Builder(MainActivity.this);
builder.setTitle("Choose Colors")
.setMultiChoiceItems(colors,icount, new DialogInterface.OnMultiChoiceClickListener() {
@Override
public void onClick(DialogInterface arg0, int arg1, boolean arg2) {
if (arg2) {
// If user select a item then add it in selected items
slist.add(arg1);
} else if (slist.contains(arg1)) {
// if the item is already selected then remove it
slist.remove(Integer.valueOf(arg1));
}
}
}) .setCancelable(false)
.setPositiveButton("Yes", new DialogInterface.OnClickListener() {
@Override
public void onClick(DialogInterface dialog, int which) {
msg = "";
for (int i = 0; i < slist.size(); i++) {
msg = msg + "\n" + (i + 1) + " : " + colors[slist.get(i)];
}
Toast.makeText(getApplicationContext(), "Total " + slist.size() + " Items Selected.\n" + msg, Toast.LENGTH_SHORT).show();
}
})
.setNegativeButton("No", new DialogInterface.OnClickListener() {
@Override
public void onClick(DialogInterface dialog, int which) {
Toast.makeText(MainActivity.this,"No Option Selected",Toast.LENGTH_SHORT).show();
}
});
//Creating dialog box
AlertDialog dialog = builder.create();
dialog.show();
}
});
}
}
If you observe above code we are calling our layout using setContentView method in the form of R.layout.layout_file_name in our activity file. Here our xml file name is activity_main.xml so we used file name activity_main and we are trying to show the list of items in AlertDialog on Button click.
Generally, during the launch of our activity, the onCreate() callback method will be called by the android framework to get the required layout for an activity.
When we run the above example using an android virtual device (AVD) we will get a result like as shown below.
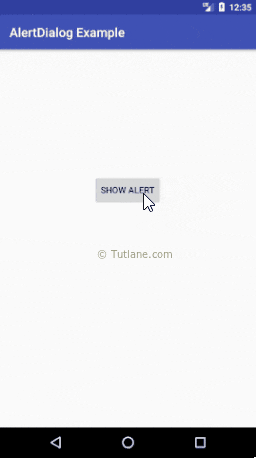
This is how we can use AlertDialog control in android applications to show the list items with checkboxes in alert dialog based on our requirements in android applications.