In android, TableLayout is a ViewGroup subclass that is used to display the child View elements in rows and columns.
Following is the pictorial representation of table layout in android applications.

In android, TableLayout will position its children elements into rows and columns and it won’t display any border lines for rows, columns or cells.
The TableLayout in android will work same as the HTML table and the table will have as many columns as the row with the most cells. The TableLayout can be explained as <table> and TableRow is like <tr> element.
Following is the example of creating a TableLayout with different controls in android application.
Create a new android application using android studio and give names as TableLayout. In case if you are not aware of creating an app in android studio check this article Android Hello World App.
Now open an activity_main.xml file from \res\layout path and write the code like as shown below
<?xml version="1.0" encoding="utf-8"?>
<TableLayout xmlns:android="http://schemas.android.com/apk/res/android"
android:layout_width="match_parent"
android:layout_height="match_parent"
android:layout_marginTop="100dp"
android:paddingLeft="10dp"
android:paddingRight="10dp" >
<TableRow android:background="#0079D6" android:padding="5dp">
<TextView
android:layout_width="wrap_content"
android:layout_height="wrap_content"
android:layout_weight="1"
android:text="UserId" />
<TextView
android:layout_width="wrap_content"
android:layout_height="wrap_content"
android:layout_weight="1"
android:text="User Name" />
<TextView
android:layout_width="wrap_content"
android:layout_height="wrap_content"
android:layout_weight="1"
android:text="Location" />
</TableRow>
<TableRow android:background="#DAE8FC" android:padding="5dp">
<TextView
android:layout_width="wrap_content"
android:layout_height="wrap_content"
android:layout_weight="1"
android:text="1" />
<TextView
android:layout_width="wrap_content"
android:layout_height="wrap_content"
android:layout_weight="1"
android:text="Suresh Dasari" />
<TextView
android:layout_width="wrap_content"
android:layout_height="wrap_content"
android:layout_weight="1"
android:text="Hyderabad" />
</TableRow>
<TableRow android:background="#DAE8FC" android:padding="5dp">
<TextView
android:layout_width="wrap_content"
android:layout_height="wrap_content"
android:layout_weight="1"
android:text="2" />
<TextView
android:layout_width="wrap_content"
android:layout_height="wrap_content"
android:layout_weight="1"
android:text="Rohini Alavala" />
<TextView
android:layout_width="wrap_content"
android:layout_height="wrap_content"
android:layout_weight="1"
android:text="Guntur" />
</TableRow>
<TableRow android:background="#DAE8FC" android:padding="5dp">
<TextView
android:layout_width="wrap_content"
android:layout_height="wrap_content"
android:layout_weight="1"
android:text="3" />
<TextView
android:layout_width="wrap_content"
android:layout_height="wrap_content"
android:layout_weight="1"
android:text="Trishika Dasari" />
<TextView
android:layout_width="wrap_content"
android:layout_height="wrap_content"
android:layout_weight="1"
android:text="Guntur" />
</TableRow>
</TableLayout>
Once we are done with creation of layout, we need to load the XML layout resource from our activity onCreate() callback method, for that open main activity file MainActivity.java from \java\com.tutlane.tablelayout path and write the code like as shown below.
package com.tutlane.linearlayout;
import android.support.v7.app.AppCompatActivity;
import android.os.Bundle;
public class MainActivity extends AppCompatActivity {
@Override
protected void onCreate(Bundle savedInstanceState) {
super.onCreate(savedInstanceState);
setContentView(R.layout.activity_main);
}
}
If you observe above code, we are calling our layout using setContentView method in the form of R.layout.layout_file_name. Here our xml file name is activity_main.xml so we used file name activity_main.
Generally, during the launch of our activity, onCreate() callback method will be called by android framework to get the required layout for an activity.
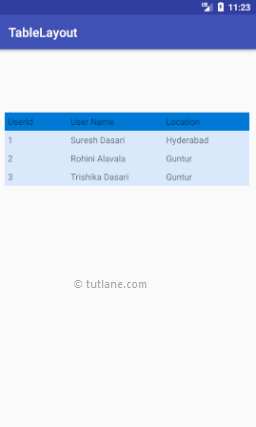
When we run above example using the android virtual device (AVD) we will get a result like as shown below.
This is how we can use the table layout in android applications based on our requirements.