In android, Fragments are the modular section of activity design and these are used to represent the behavior of user interface (UI) in an activity. By using fragments we can create flexible UI designs that can be adjusted based on the device screen size such as tablets, smartphones.
We can build multi-pane UI by combining multiple fragments in a single activity and we can reuse the same fragment in multiple activities. The fragment has its own lifecycle call-backs and accepts its own input events.
We can add or remove fragments in an activity while the activity is running. In android, the fragment will act as a sub-activity and we can reuse it in multiple activities.
Generally in android, the fragment must be included in an activity due to that the fragment lifecycle will always be affected by the host activity life cycle. In case if we pause an activity, all the fragments related to an activity will also be stopped.
In android, we can insert the fragment into activity layout by using <fragment> element and by dividing the layout of activity into fragments, we can modify the appearance of an app design at runtime. We can also implement a fragment without having any user interface (UI).
It’s an optional to use fragments into activity but by doing this it will improve the flexibility of our app UI and make it easier to adjust our app design based on the device size.
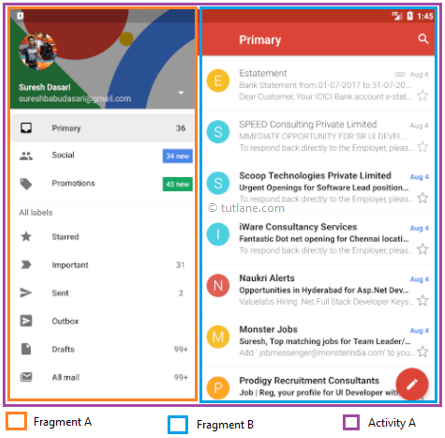
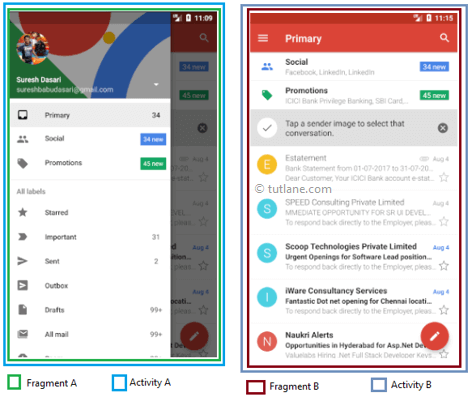
Following is the example of defining a multiple fragments in single activity for the tablet design to display the details of an item which we selected in the app, but separated for mobile design.

If you observe above example for Tablet we defined an Activity A with two fragments such as one is to show the list of items and second one is to show the details of item which we selected in first fragment.
For Handset device, there is no enough space to show both the fragments in single activity, so the Activity A includes first fragment to show the list of items and the Activity B which includes another fragment to display the details of an item which is selected in Activity A.
For example, GMAIL app is designed with multiple fragments, so the design of GMAIL app will be varied based on the size of device such as tablet or mobile device.
Table View

Mobile View

Following is a pictorial representation of the android fragment life cycle while its activity is running.

Following are the list of methods which will perform during the lifecycle of fragment in android applications.
| Method | Description |
|---|---|
| onAttach() | It is called when the fragment has been associated with an activity. |
| onCreate() | It is used to initialize the fragment. |
| onCreteView() | It is used to create a view hierarchy associated with the fragment. |
| onActivityCreated() | It is called when the fragment activity has been created and the fragment view hierarchy instantiated. |
| onStart() | It is used to make the fragment visible. |
| onResume() | It is used to make the fragment visible in an activity. |
| onPause() | It is called when fragment is no longer visible and it indicates that the user is leaving the fragment. |
| onStop() | It is called to stop the fragment using the onStop() method. |
| onDestoryView() | The view hierarchy associated with the fragment is being removed after executing this method. |
| onDestroy() | It is called to perform a final clean up of the fragments state. |
| onDetach() | It is called immediately after the fragment disassociated from the activity. |
Following is the example of creating a two fragments, two buttons and showing the respective fragment when click on button in android application.
Create a new android application using android studio and give names as Fragments. In case if you are not aware of creating an app in android studio check this article Android Hello World App.
Now we need to create our own custom fragment layout files (listitems_info.xml, details_info.xml) in \res\layout path to display those fragments in the main layout for that right-click on your layout folder à Go to New à select Layout resource file and give name as listitems_info.xml.
Once we create a new file listitems_info.xml, open it and write the code like as shown below
<?xml version="1.0" encoding="utf-8"?>
<LinearLayout xmlns:android="http://schemas.android.com/apk/res/android"
android:orientation="vertical" android:layout_width="match_parent"
android:layout_height="match_parent">
<ListView
android:layout_width="match_parent"
android:layout_height="wrap_content"
android:id="@android:id/list" />
</LinearLayout>
Same way create another file details_info.xml, open it and write the code like as shown below
<?xml version="1.0" encoding="utf-8"?>
<LinearLayout xmlns:android="http://schemas.android.com/apk/res/android"
android:orientation="vertical" android:layout_width="match_parent"
android:layout_height="match_parent"
android:background="#0079D6">
<TextView
android:layout_width="wrap_content"
android:layout_height="wrap_content"
android:textColor="#ffffff"
android:layout_marginTop="200px"
android:layout_marginLeft="200px"
android:id="@+id/Name"/>
<TextView
android:layout_width="wrap_content"
android:layout_height="wrap_content"
android:layout_marginLeft="200px"
android:textColor="#ffffff"
android:id="@+id/Location"/>
</LinearLayout>
Now we need to create our own custom fragment class files (ListMenuFragment.java, DetailsFragment.java) in \java\com.tutlane.fragmentsexample path to bind and display data in fragments for that right-click on your application folder à Go to New à select Java Class and give name as DetailsFragment.java.
Once we create a new file DetailsFragment.java, open it and write the code like as shown below
package com.tutlane.fragmentsexample;
import android.app.Fragment;
import android.os.Bundle;
import android.view.LayoutInflater;
import android.view.View;
import android.view.ViewGroup;
import android.widget.TextView;
/**
* Created by tutlane on 06-08-2017.
*/
public class DetailsFragment extends Fragment {
TextView name,location;
@Override
public View onCreateView(LayoutInflater inflater, ViewGroup container, Bundle savedInstanceState) {
View view = inflater.inflate(R.layout.details_info, container, false);
name = (TextView)view.findViewById(R.id.Name);
location = (TextView)view.findViewById(R.id.Location);
return view;
}
public void change(String uname, String ulocation){
name.setText(uname);
location.setText(ulocation);
}
}
If you observe above code we extended class with Fragment and used LayoutInflater to show the details of fragment. We defined a function change() to change the text in textview.
Same way create another file ListMenuFragment.java, open it and write the code like as shown below
package com.tutlane.fragmentsexample;
import android.app.ListFragment;
import android.os.Bundle;
import android.view.LayoutInflater;
import android.view.View;
import android.view.ViewGroup;
import android.widget.ArrayAdapter;
import android.widget.ListView;
/**
* Created by tutlane on 06-08-2017.
*/
public class ListMenuFragment extends ListFragment {
String[] users = new String[] { "Suresh","Rohini","Trishika","Praveen","Sateesh","Madhav" };
String[] location = new String[]{"Hyderabad","Guntur","Hyderabad","Bangalore","Vizag","Nagpur"};
@Override
public View onCreateView(LayoutInflater inflater, ViewGroup container, Bundle savedInstanceState) {
View view =inflater.inflate(R.layout.listitems_info, container, false);
ArrayAdapter<String> adapter = new ArrayAdapter<String>(getActivity(),
android.R.layout.simple_list_item_1, users);
setListAdapter(adapter);
return view;
}
@Override
public void onListItemClick(ListView l, View v, int position, long id) {
DetailsFragment txt = (DetailsFragment)getFragmentManager().findFragmentById(R.id.fragment2);
txt.change("Name: "+ users[position],"Location : "+ location[position]);
getListView().setSelector(android.R.color.holo_blue_dark);
}
}
If you observe above code we extended our class using ListFragment and we defined two array of strings users, location which contains names and locations. We defined onListItemClick event to update the name and location in DetailsFragment based on the list item which we clicked.
Now we need to display our fragments horizontally side by side in main layout for that open activity_main.xml file and write code like as shown below
<?xml version="1.0" encoding="utf-8"?>
<LinearLayout xmlns:android="http://schemas.android.com/apk/res/android"
xmlns:tools="http://schemas.android.com/tools"
android:layout_width="match_parent"
android:layout_height="match_parent"
android:orientation="horizontal"
tools:context="com.tutlane.fragmentsexample.MainActivity">
<fragment
android:layout_height="match_parent"
android:layout_width="350px"
class="com.tutlane.fragmentsexample.ListMenuFragment"
android:id="@+id/fragment"/>
<fragment
android:layout_width="match_parent"
android:layout_height="match_parent"
class="com.tutlane.fragmentsexample.DetailsFragment"
android:id="@+id/fragment2"/>
</LinearLayout>
We are not going to make any modifications for our main activity file (MainActivity.java) and manifest file (AndroidMainfest.xml).
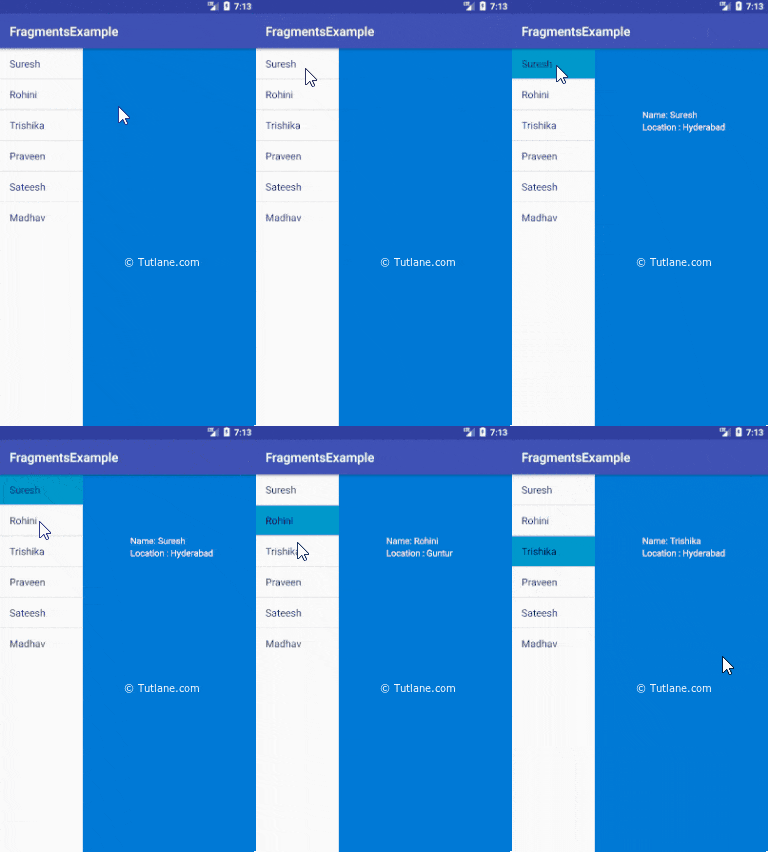
When we execute the above example in the android emulator we will get a result like as shown below

This is how we can use fragments in activity to build multi-pane UI to adjust the android application layout based on the size of a device such as tablets or smartphones, etc. based on our requirements.