By using Google Maps Android API we can integrate google maps in android applications to show the location details on map based on our requirements.
To use google maps in our android applications we need to install Google Play Services SDK in our Android Studio because google made Google Mas API as a part of Google Play Services SDK.
To install Google Play Services, open Android Studio à Go to Tools menu à Android à click SDK Manager, then new window will open in that select SDK Tools tab à Select Google Play Services à click OK like as shown below.

Once we are done with Google Play Services installation in android studio, now we will see how to integrate google map in android app with examples.
Following is the example of adding or integrating a google map in android application.
Create a new android application using android studio and give names as GoogleMapExample like as shown below.

Now we need to select the form factors which we need for our app. In case if you're not sure what you need, just select Phone and Tablet and then click Next like as shown below.

Now select the Google Maps Activity in 'Add an activity to Mobile' dialog and click Next like as shown below.

Customize the activity by entering activity name, layout name and title as prompted. In case if default values are fine, then click Finish like as shown below.

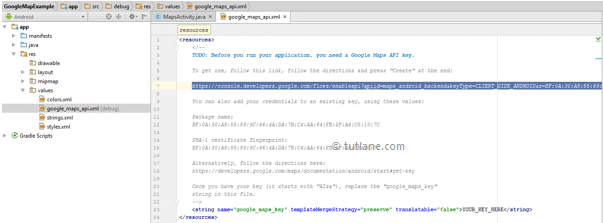
Once the project created, Android Studio will open google_maps_api.xml and MapsActivity.java files in the editor. The google_maps_api.xml file will contains instructions to generate a Google Maps API key to access Google Maps servers. Copy the link provided in the google_maps_api.xml file like as shown below.
Copy and paste the console URL in browser and it will take you to Google API Console like as shown below. Follow the instructions to create a new project on Google API Console like as shown below.

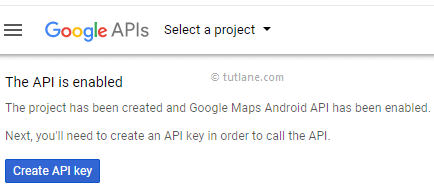
Once we click on continue it will create a project and Google Maps Android API will be enabled. Now we need to create an API key to call the API for that click on Create API Key like as shown below.
Once we click on Create API Key, it will create an API key to use it in our applications like as shown below.

Now copy the API Key, go back to android studio and paste the API key into the <string> element in google_maps_api.xml file like as shown below.
<string name="google_maps_key" templateMergeStrategy="preserve" translatable="false">AIzaSyCKPTaBv41DKqr9qxMPWOQAsqp0Q4NHMER</string>
By default, the XML file (activity_maps.xml) that defines the app's layout is at res/layout/ contains the following code.
<fragment xmlns:android="http://schemas.android.com/apk/res/android"
xmlns:map="http://schemas.android.com/apk/res-auto"
xmlns:tools="http://schemas.android.com/tools"
android:id="@+id/map"
android:name="com.google.android.gms.maps.SupportMapFragment"
android:layout_width="match_parent"
android:layout_height="match_parent"
tools:context="com.tutlane.googlemapexample.MapsActivity" />
Our application manifest file (AndroidManifest.xml) will contain the code like as shown below with required our Google Maps API Key and permissions.
<?xml version="1.0" encoding="utf-8"?>
<manifest xmlns:android="http://schemas.android.com/apk/res/android"
package="com.tutlane.googlemapexample">
<uses-permission android:name="android.permission.ACCESS_FINE_LOCATION" />
<application
android:allowBackup="true"
android:icon="@mipmap/ic_launcher"
android:label="@string/app_name"
android:roundIcon="@mipmap/ic_launcher_round"
android:supportsRtl="true"
android:theme="@style/AppTheme">
<meta-data
android:name="com.google.android.geo.API_KEY"
android:value="@string/google_maps_key" />
<activity
android:name=".MapsActivity"
android:label="@string/title_activity_maps">
<intent-filter>
<action android:name="android.intent.action.MAIN" />
<category android:name="android.intent.category.LAUNCHER" />
</intent-filter>
</activity>
</application>
</manifest>
If you observe above code it contains a user permission to access location and Meta tag to get google maps API key.
By default, the Java file (MapsActivity.java) that defines the maps activity will contain the following code.
package com.tutlane.googlemapexample;
import android.support.v4.app.FragmentActivity;
import android.os.Bundle;
import com.google.android.gms.maps.CameraUpdateFactory;
import com.google.android.gms.maps.GoogleMap;
import com.google.android.gms.maps.OnMapReadyCallback;
import com.google.android.gms.maps.SupportMapFragment;
import com.google.android.gms.maps.model.LatLng;
import com.google.android.gms.maps.model.MarkerOptions;
public class MapsActivity extends FragmentActivity implements OnMapReadyCallback {
private GoogleMap mMap;
@Override
protected void onCreate(Bundle savedInstanceState) {
super.onCreate(savedInstanceState);
setContentView(R.layout.activity_maps);
// Obtain the SupportMapFragment and get notified when the map is ready to be used.
SupportMapFragment mapFragment = (SupportMapFragment) getSupportFragmentManager()
.findFragmentById(R.id.map);
mapFragment.getMapAsync(this);
}
@Override
public void onMapReady(GoogleMap googleMap) {
mMap = googleMap;
// Add a marker in hyderabad and move the camera
LatLng hyderadbad = new LatLng(17, 78);
mMap.addMarker(new MarkerOptions().position(hyderadbad).title("Tutlane in India"));
mMap.moveCamera(CameraUpdateFactory.newLatLng(hyderadbad));
}
}
Generally, during the launch of our activity, onCreate() callback method will be called by android framework to get the required layout for an activity.
When we run the above example using an android virtual device (AVD) we will get a result like as shown below.

If you observe above result, we are able to see a map with a marker positioned over Hyderabad, India in our application.
We can customize the appearance of a map based on our requirements in the android application.
The Google Maps Android API provides a map in different types such as Normal, Hybrid, Satellite, Terrain and None.
| Map Type | Description |
|---|---|
| Normal | Typical road map. Shows roads, some features built by humans, and important natural features like rivers. Road and feature labels are also visible. |
| Hybrid | Satellite photograph data with road maps added. Road and feature labels are also visible. |
| Satellite | Satellite photograph data. Road and feature labels are not visible. |
| Terrian | Topographic data. The map includes colors, contour lines and labels, and perspective shading. Some roads and labels are also visible. |
| None | No tiles. The map will be rendered as an empty grid with no tiles loaded. |
In android, we can change the type of a map by calling the GoogleMap object’s setMapType() method, by passing the type of constants defined in GoogleMap.
Following is the example of displaying the map type as Satellite in the android application.
GoogleMap map;
......
// Set Map type as Satellite
map.setMapType(GoogleMap.MAP_TYPE_SATELLITE);
// Same way we can set other type maps also like as below.
map.setMapType(GoogleMap.MAP_TYPE_NORMAL);
map.setMapType(GoogleMap.MAP_TYPE_HYBRID);
map.setMapType(GoogleMap.MAP_TYPE_TERRAIN);
map.setMapType(GoogleMap.MAP_TYPE_NONE);
This is how we can add or integrate google maps in android applications and use different map types based on our requirements.