In android, Navigation Drawer is a panel that displays the app's main navigation options on the left edge of the screen like a sliding menu. The navigation drawer is hidden most of the time, but it is revealed when the user swipes a finger from the left edge of the screen or, while at the top level of the app, the user touches the app icon in the action bar.
The Navigation Drawer slides in from the left and contains the navigation destinations for our app. While creating the android application if we select Navigation Drawer Activity, automatically the navigation drawer menu will be created with all required sliding menu options.
Now we will see how to create navigation drawer sliding menu using Navigation Drawer Activity in android application with example.
Android Navigation Drawer Example
Following is the example of creating navigation drawer sliding menu in the android application.
Create a new android application using android studio and give names as NavigationDrawerExample like as shown below.

Now we need to select the form factors which we need for our app. In case if you're not sure what you need, just select Phone and Tablet and then click Next like as shown below.

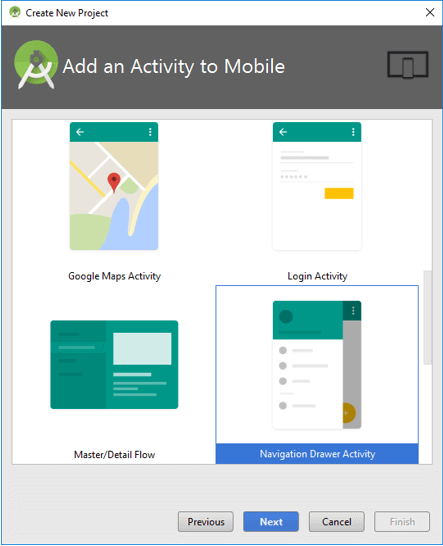
Now select the Navigation Drawer Activity in 'Add an activity to Mobile' dialog and click Next like as shown below.

Customize the activity by entering activity name, layout name and title as prompted. In case if default values are fine, then click Finish like as shown below.

Once the project created, automatically all the required details will be added in a project to create the navigation drawer sliding menu like as shown below.

If you observe the above project structure, the android studio automatically created all the required files to create navigation drawer sliding menu.
Now open activity_main.xml file from \res\layout folder path and it will contain the code like as shown below.
activity_main.xml
<?xml version="1.0" encoding="utf-8"?>
<android.support.v4.widget.DrawerLayout xmlns:android="http://schemas.android.com/apk/res/android"
xmlns:app="http://schemas.android.com/apk/res-auto"
xmlns:tools="http://schemas.android.com/tools"
android:id="@+id/drawer_layout"
android:layout_width="match_parent"
android:layout_height="match_parent"
android:fitsSystemWindows="true"
tools:openDrawer="start">
<include
layout="@layout/app_bar_main"
android:layout_width="match_parent"
android:layout_height="match_parent" />
<android.support.design.widget.NavigationView
android:id="@+id/nav_view"
android:layout_width="wrap_content"
android:layout_height="match_parent"
android:layout_gravity="start"
android:fitsSystemWindows="true"
app:headerLayout="@layout/nav_header_main"
app:menu="@menu/activity_main_drawer" />
</android.support.v4.widget.DrawerLayout>
Now open your main activity file MainActivity.java from \java\com.tutlane.audioplayerexample path and write the code like as shown below
MainActivity.java
package com.tutlane.navigationdrawerexample;
import android.os.Bundle;
import android.support.design.widget.FloatingActionButton;
import android.support.design.widget.Snackbar;
import android.view.View;
import android.support.design.widget.NavigationView;
import android.support.v4.view.GravityCompat;
import android.support.v4.widget.DrawerLayout;
import android.support.v7.app.ActionBarDrawerToggle;
import android.support.v7.app.AppCompatActivity;
import android.support.v7.widget.Toolbar;
import android.view.Menu;
import android.view.MenuItem;
public class MainActivity extends AppCompatActivity
implements NavigationView.OnNavigationItemSelectedListener {
@Override
protected void onCreate(Bundle savedInstanceState) {
super.onCreate(savedInstanceState);
setContentView(R.layout.activity_main);
Toolbar toolbar = (Toolbar) findViewById(R.id.toolbar);
setSupportActionBar(toolbar);
FloatingActionButton fab = (FloatingActionButton) findViewById(R.id.fab);
fab.setOnClickListener(new View.OnClickListener() {
@Override
public void onClick(View view) {
Snackbar.make(view, "Replace with your own action", Snackbar.LENGTH_LONG)
.setAction("Action", null).show();
}
});
DrawerLayout drawer = (DrawerLayout) findViewById(R.id.drawer_layout);
ActionBarDrawerToggle toggle = new ActionBarDrawerToggle(
this, drawer, toolbar, R.string.navigation_drawer_open, R.string.navigation_drawer_close);
drawer.setDrawerListener(toggle);
toggle.syncState();
NavigationView navigationView = (NavigationView) findViewById(R.id.nav_view);
navigationView.setNavigationItemSelectedListener(this);
}
@Override
public void onBackPressed() {
DrawerLayout drawer = (DrawerLayout) findViewById(R.id.drawer_layout);
if (drawer.isDrawerOpen(GravityCompat.START)) {
drawer.closeDrawer(GravityCompat.START);
} else {
super.onBackPressed();
}
}
@Override
public boolean onCreateOptionsMenu(Menu menu) {
// Inflate the menu; this adds items to the action bar if it is present.
getMenuInflater().inflate(R.menu.main, menu);
return true;
}
@Override
public boolean onOptionsItemSelected(MenuItem item) {
// Handle action bar item clicks here. The action bar will
// automatically handle clicks on the Home/Up button, so long
// as you specify a parent activity in AndroidManifest.xml.
int id = item.getItemId();
//noinspection SimplifiableIfStatement
if (id == R.id.action_settings) {
return true;
}
return super.onOptionsItemSelected(item);
}
@SuppressWarnings("StatementWithEmptyBody")
@Override
public boolean onNavigationItemSelected(MenuItem item) {
// Handle navigation view item clicks here.
int id = item.getItemId();
if (id == R.id.nav_camera) {
// Handle the camera action
} else if (id == R.id.nav_gallery) {
} else if (id == R.id.nav_slideshow) {
} else if (id == R.id.nav_manage) {
} else if (id == R.id.nav_share) {
} else if (id == R.id.nav_send) {
}
DrawerLayout drawer = (DrawerLayout) findViewById(R.id.drawer_layout);
drawer.closeDrawer(GravityCompat.START);
return true;
}
}
If you want to modify the default navigation drawer sliding menu, then you need to customize the code based on your requirements.
Output of Android Navigation Drawer Example
When we run the above program in the android studio we will get the result as shown below.

If you observe the above result, the Navigation Drawer slides in from the left and contains the navigation destinations for our app. We can customize the navigation drawer by changing the default things based on our requirements.
This is how we can implement the navigation drawer sliding menu in android applications based on our requirements.
