In android, App widgets are the small application views that can be embedded in other applications such as the Home screen to quickly access the application data.
These application views are referred as widgets in the user interface and we can publish these views using an App Widget Provider. An application component that is able to hold other app widgets is called an App Widget Host.
Some of the commonly used android widgets are clock widget, weather widget, music widget, etc. based on our requirements.
To create an App Widget, the following are the main components that we need to use it in our android applications.
| Component | Description |
|---|---|
| AppWidgetProviderInfo | This object is used to define the metadata of an App Widget such as the App Widget's layout, update frequency, and the AppWidgetProvider class. This should be defined in XML. |
| AppWidgetProvider | This is best for paging across a collection of objects for which the number of pages is undetermined. It destroys fragments as the user navigates to other pages, minimizing memory usage. |
| View layout | It defines the initial layout for the App Widget. This should be defined in XML. |
To create an app widget for our android application, we need to setup the following components.
We need to add AppWidgetProvider object in our application manifest (AndroidManifest.xml) file like as shown below.
<receiver android:name="ExampleAppWidgetProvider" >
<intent-filter>
<action android:name="android.appwidget.action.APPWIDGET_UPDATE" />
</intent-filter>
<meta-data android:name="android.appwidget.provider"
android:resource="@xml/example_appwidget_info" />
</receiver>
The name attribute of receiver element will specify the AppWidgetProvider used by the App Widget and intent filter is used to specify that the AppWidgetProvider accepts ACTION_APPWIDGET_UPDATE broadcast and meta-data element is used to specify AppWidgetProvider resource.
We need to define an initial layout for our app widget in XML and save it in the project’s res/layout directory. We can design our app widget layout using the following layout and widget classes.
To create an app widget, we need to define AppWidgetProviderInfo object with all required properties, such as layout dimensions, initial layout source, how often to update the app widget, etc. using <appwidget-provider> element and save it in the project’s res/xml/ folder like as shown below.
<appwidget-provider xmlns:android="http://schemas.android.com/apk/res/android"
android:minWidth="40dp"
android:minHeight="40dp"
android:updatePeriodMillis="86400000"
android:previewImage="@drawable/preview"
android:initialLayout="@layout/example_appwidget"
android:configure="com.example.android.ExampleAppWidgetConfigure"
android:resizeMode="horizontal|vertical"
android:widgetCategory="home_screen">
</appwidget-provider>
If you observe above code, we define an appwidgetprovider with all required attributes to define an app widget in android application.
To handle app widget broadcasts, we need to create a new Java file or use the existing file by extending it with AppWidgetProvider class and override its update method like as shown below.
public class ExampleAppWidgetProvider extends AppWidgetProvider {
public void onUpdate(Context context, AppWidgetManager appWidgetManager, int[] appWidgetIds) {
final int N = appWidgetIds.length;
// Perform this loop procedure for each App Widget that belongs to this provider
for (int i=0; i<N; i++) {
int appWidgetId = appWidgetIds[i];
// Create an Intent to launch ExampleActivity
Intent intent = new Intent(context, ExampleActivity.class);
PendingIntent pendingIntent = PendingIntent.getActivity(context, 0, intent, 0);
// Get the layout for the App Widget and attach an on-click listener
// to the button
RemoteViews views = new RemoteViews(context.getPackageName(), R.layout.appwidget_provider_layout);
views.setOnClickPendingIntent(R.id.button, pendingIntent);
// Tell the AppWidgetManager to perform an update on the current app widget
appWidgetManager.updateAppWidget(appWidgetId, views);
}
}
}
If you observe above code, the AppWidgetProvider defines only the onUpdate() method for the purpose of defining a PendingIntent that launches an Activity and attaching it to the App Widget's button with setOnClickPendingIntent(int, PendingIntent).
Apart from the onUpdate() method, the AppWidgetProvider contains the following methods to manipulate app widget in our applications.
| Method | Description |
|---|---|
| onDeleted | This method is called every time an App Widget is deleted from the App Widget host. |
| onEnabled | This method is called when an instance of the App Widget is created for the first time. |
| onDisabled | This method is called when the last instance of your App Widget is deleted from the App Widget host. |
| onReceive | This method is called for every broadcast and before each of the above callback methods. |
Now we will see how to create an app widget for android application and embed it on home screen with example.
Following is the example of creating an app widget and add it to home screen using appwidgetprovider in android application.
Create a new android application using android studio and give names as WidgetExample. In case if you are not aware of creating an app in android studio check this article Android Hello World App.
Once we create an application, open activity_main.xml file from \res\layout folder path and write the code like as shown below.
<?xml version="1.0" encoding="utf-8"?>
<LinearLayout xmlns:android="http://schemas.android.com/apk/res/android"
android:orientation="vertical" android:layout_width="match_parent"
android:layout_height="match_parent">
<TextView
android:id="@+id/fstTxt"
android:layout_width="wrap_content"
android:layout_height="wrap_content"
android:text="Tutlane.com"
android:layout_gravity="center"
android:textSize="18dp"/>
<Button
android:id="@+id/btnClick"
android:layout_width="wrap_content"
android:layout_height="wrap_content"
android:text="App Widget"
android:layout_gravity="center"/>
</LinearLayout>
Now create a new folder xml under res folder and add new layout resource file (samplewidget.xml) in \res\xml path, for that right click on your xml folder à Go to New à select Layout Resource File and give name as samplewidget.xml.
Once we create a new layout resource file samplewidget.xml, open it and write the code like as shown below
<?xml version="1.0" encoding="utf-8"?>
<appwidget-provider
xmlns:android="http://schemas.android.com/apk/res/android"
android:minWidth="146dp"
android:updatePeriodMillis="0"
android:minHeight="146dp"
android:initialLayout="@layout/activity_main">
</appwidget-provider>
Now we need to create new activity file WidgetActivity.java in \java\com.tutlane.widgetexample path, for that right click on your application folder à Go to New à select Java Class and give name as WidgetActivity.java.
Once we create a new fragment file WidgetActivity.java, open it and write the code like as shown below
package com.tutlane.widgetexample;
import android.app.PendingIntent;
import android.appwidget.AppWidgetManager;
import android.appwidget.AppWidgetProvider;
import android.content.Context;
import android.content.Intent;
import android.net.Uri;
import android.widget.RemoteViews;
import android.widget.Toast;
/**
* Created by tutlane on 20-01-2018.
*/
public class WidgetActivity extends AppWidgetProvider {
public void onUpdate(Context context, AppWidgetManager appWidgetManager, int[] appWidgetIds) {
for(int i=0; i<appWidgetIds.length; i++){
int appWidgetId = appWidgetIds[i];
String url = "http://tutlane.com";
Intent intent = new Intent(Intent.ACTION_VIEW);
intent.addFlags(Intent.FLAG_ACTIVITY_NEW_TASK);
intent.setData(Uri.parse(url));
PendingIntent pending = PendingIntent.getActivity(context, 0,intent, 0);
RemoteViews views = new RemoteViews(context.getPackageName(),R.layout.activity_main);
views.setOnClickPendingIntent(R.id.btnClick, pending);
appWidgetManager.updateAppWidget(appWidgetId,views);
Toast.makeText(context, "widget added", Toast.LENGTH_SHORT).show();
}
}
}
If you observe above code, we used AppWidgetProvider to implement app widget based on our requirements.
Now open your main activity file MainActivity.java from \java\com.tutlane.widgetexample path and write the code like as shown below.
We need to add <receiver> element our android application manifest file (AndroidManifest.xml) for that open manifest file and write the code like as shown below.
<?xml version="1.0" encoding="utf-8"?>
<manifest xmlns:android="http://schemas.android.com/apk/res/android"
package="com.tutlane.widgetexample">
<application
android:allowBackup="true"
android:icon="@mipmap/ic_launcher"
android:label="@string/app_name"
android:roundIcon="@mipmap/ic_launcher_round"
android:supportsRtl="true"
android:theme="@style/AppTheme">
<activity android:name=".MainActivity">
<intent-filter>
<action android:name="android.intent.action.MAIN" />
<category android:name="android.intent.category.LAUNCHER" />
</intent-filter>
</activity>
<receiver android:name=".WidgetActivity">
<intent-filter>
<action android:name="android.appwidget.action.APPWIDGET_UPDATE"></action>
</intent-filter>
<meta-data android:name="android.appwidget.provider"
android:resource="@xml/samplewidget"></meta-data>
</receiver>
</application>
</manifest>
When we run above example in android emulator we will get a result like as shown below.
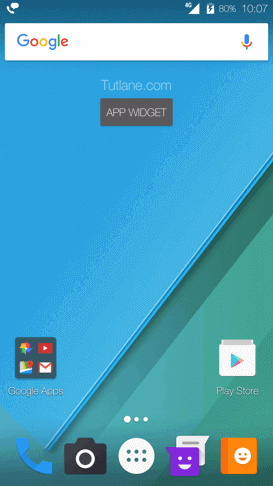
If you observe above result, we create an app widget and added to the home screen based on our requirements.
This is how we create an app widgets in android applications based on our requirements.