In android, Service is a component which keep an app running in the background to perform long-running operations based on our requirements. For Service, we don’t have any user interface and it will run the apps in the background like playing the music in the background or handle network operations when the user in a different app.
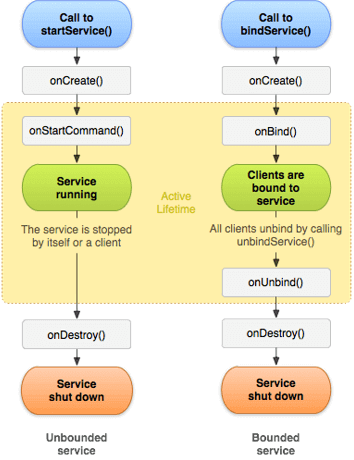
In android, the life cycle of service will follow two different paths Started or Bound.
A service is Started when an application component, such as an activity calls startService() method. Once it started, it will run indefinitely in background even if the component that started is destroyed.
We can stop the Started service by using stopService() method or the service can stop itself by calling stopSelf() method. In android, the Started service component will perform a single operation and it won’t return any result to the caller.
A service is Bound when another application component calls bindService() method. The bound service runs as long as another application component is bound to it.
We can unbind the service by calling unbindService() method based on our requirements. In android, we can bind multiple components to a single service at once, but the service will be destroyed in case all the components unbind.
Following diagram shows the lifecycle of Started service, when the service created with startService() and the lifecycle of Bound service, when the service created with bindService().

To create a service, we need to create a class that extends a Service base class or one of its existing subclasses. During our service implementation, we must need to override some of the callback methods that handle the key aspects of the service lifecycle and provide the functionality that allows our components to bind to the service.
Generally, in android to create a service we must create a subclass of Service or use one of existing subclass. In android the application component such as an activity can start the service by calling startService() which results in calling the service’s onStartCommand() method.
Following is the simple example of creating a service in android application.
public class SampleService extends Service {
@Override
public int onStartCommand(Intent intent, int flags, int startId) {
//TODO write your own code
return Service.START_NOT_STICKY;
}
@Override
public IBinder onBind(Intent intent) {
//TODO for communication return IBinder implementation
return null;
}
}
Once we create a service, we need to register that in android manifest file using <service> element like as shown below.
<manifest ... >
...
<application ... >
<service android:name=".SampleService" />
</application>
...
</manifest>
In android, the component such as an activity, service or receiver can start the service using startService() method. Following is the sample code snippet of starting a service using the startService method.
Intent intent = new Intent(this, MyService.class);
startService(intent);
During the service implementation, following are the callback methods that we need to override in android application.
onStartCommand()
The system will invoke this method when another component such as an activity requests the service to be started by calling startService(). When this method executed, the service will start and run indefinitely in background. If we implement this in our code, it’s our responsibility to stop the service once code execution is done by calling stopSelf() or stopService() methods. In case, if we want to provide only binding, then we don’t need to implement this method.
In android, onStartCommand() method must return an integer and the integer is a value that describes how the system will continue the service in the event that the system kills it.
The onStartCommand() method will return a value from one of the following constants.
| Option | Description |
|---|---|
| START_STICKY | It will restart the service in case if it terminated and the Intent data which is passed to the onStartCommand() method is NULL. This is suitable for the service which are not executing commands but running independently and waiting for the job. |
| START_NOT_STICKY | It will not restart the service and it is useful for the services which will run periodically. The service will restart only when there are a pending startService() calls. It’s the best option to avoid running a service in case if it is not necessary. |
| START_REDELIVER_INTENT | It’s same as STAR_STICY and it recreates the service, call onStartCommand() with last intent that was delivered to the service. |
onBind()
The system will invoke this method when another component wants to bind with the service by calling bindService(). During implementation of this method, we must need to provide an interface to the clients to communicate with the service by returning an IBinder object. In android, we must need to implement this method, in case if we don’t need to allow binding, then we should return NULL.
onCreate()
The system will invoke this method when the service is created initially using onStartCommand() or onBind() methods to do one-time setup procedures. In case, if the service is already running, then this method will not call.
onDestroy()
The system will invoke this method when the service is no longer used and is being destroyed. This is the final call that the service will receive and we need to implement this method in our service to clean up any unused resources such as threads, receivers or listeners.
Generally, in android if we start a service by calling startService() method, the service will run continuously even if the component that started service is destroyed until we stop it by using stopService() or it stops itself with stopSelf().
Same way, if we create a service by calling bindService() method, the service will runs as long as the component is bound to it. After the service is unbound from all of its clients, the system will destroy it.
In android, the service life cycle is having a set of callback methods that need to be implemented to keep a track of services status and to execute the required things in appropriate-time.
Following is the skeleton service that describes about each of the lifecycle methods.
package com.tutlane.services;
import android.app.Service;
import android.content.Intent;
import android.os.IBinder;
public class SampleService extends Service {
int mStartMode; // It indicates how to behave if the service is killed
IBindermBinder; // interface for clients that bind
boolean mAllowRebind; // It indicates whether onRebind should be used
@Override
public void onCreate() {
// The service is being created
}
@Override
public int onStartCommand(Intent intent, int flags, int startId) {
// The service is starting, due to a call to startService()
return mStartMode;
}
@Override
public IBinder onBind(Intent intent) {
// A client is binding to the service with bindService()
return mBinder;
}
@Override
public boolean onUnbind(Intent intent) {
// All clients have unbound with unbindService()
return mAllowRebind;
}
@Override
public void onRebind(Intent intent) {
// A client is binding to the service with bindService(),
// after onUnbind() has already been called
}
@Override
public void onDestroy() {
// The service is no longer used and is being destroyed
}
}
Following is the example of start playing music in the background when we start a service and that music will play continuously until we stop the service in the android application.
Create a new android application using android studio and give names as Services. In case if you are not aware of creating an app in android studio check this article Android Hello World App.
Now we need to create our own custom service file MyService.java in \java\com.tutlane.services path to define our actual provider and associated methods for that right-click on your application folder à Go to New à select Java Class and give name as MyService.java.
Once we create a new file MyService.java, open it and write the code like as shown below
package com.tutlane.services;
import android.app.Service;
import android.content.Intent;
import android.media.MediaPlayer;
import android.os.IBinder;
import android.provider.Settings;
import android.widget.Toast;
/**
* Created by Tutlane on 02-08-2017.
*/
public class MyService extends Service {
private MediaPlayer player;
@Override
public IBinder onBind(Intent intent) {
return null;
}
@Override
public void onCreate() {
Toast.makeText(this, "Service was Created", Toast.LENGTH_LONG).show();
}
@Override
public int onStartCommand(Intent intent, int flags, int startId) {
player = MediaPlayer.create(this, Settings.System.DEFAULT_RINGTONE_URI);
// This will play the ringtone continuously until we stop the service.
player.setLooping(true);
// It will start the player
player.start();
Toast.makeText(this, "Service Started", Toast.LENGTH_LONG).show();
return START_STICKY;
}
@Override
public void onDestroy() {
super.onDestroy();
// Stopping the player when service is destroyed
player.stop();
Toast.makeText(this, "Service Stopped", Toast.LENGTH_LONG).show();
}
}
Now open activity_main.xml file from \src\main\res\layout path and write the following code.
Now open MainActivity.java file from \java\com.tutlane.services path and write following to implement custom broadcast intents.
package com.tutlane.services;
import android.content.Intent;
import android.support.v7.app.AppCompatActivity;
import android.os.Bundle;
import android.view.View;
public class MainActivity extends AppCompatActivity {
@Override
protected void onCreate(Bundle savedInstanceState) {
super.onCreate(savedInstanceState);
setContentView(R.layout.activity_main);
}
// Start the service
public void startService(View view) {
startService(new Intent(this, MyService.class));
}
// Stop the service
public void stopService(View view) {
stopService(new Intent(this, MyService.class));
}
}
Now we need to register our service in android manifest file (AndroidManifest.xml) using <service> attribute like as shown below.
<?xml version="1.0" encoding="utf-8"?>
<manifest xmlns:android="http://schemas.android.com/apk/res/android"
package="com.tutlane.services">
<application
android:allowBackup="true"
android:icon="@mipmap/ic_launcher"
android:label="@string/app_name"
android:roundIcon="@mipmap/ic_launcher_round"
android:supportsRtl="true"
android:theme="@style/AppTheme">
<activity android:name=".MainActivity">
<intent-filter>
<action android:name="android.intent.action.MAIN" />
<category android:name="android.intent.category.LAUNCHER" />
</intent-filter>
</activity>
<service android:name=".MyService" />
</application>
</manifest>
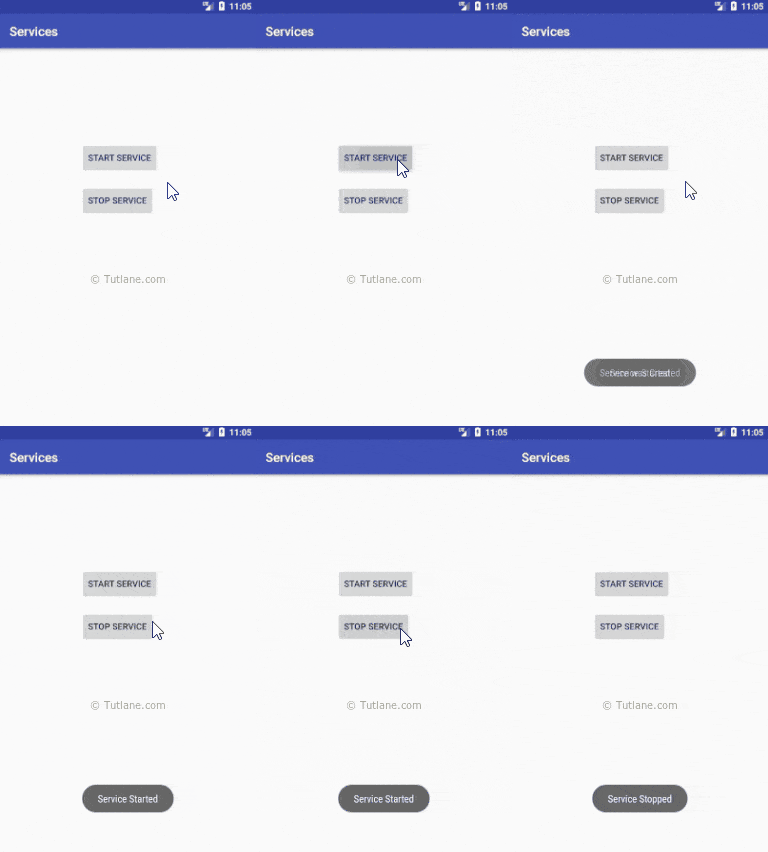
When we run above example in android emulator we will get a result like as shown below

If we click on Start Service button, the default ringtone will start playing and it will continue until we stop the service. This is how we can create, start or stop services in android applications based on our requirements.