Layout in the razor view is similar to a Master page in ASP.NET Webforms, and they are used to maintain the constant look and feel throughout the entire application. Let’s see a simple example to create Layouts in asp.net mvc razor view engine.
Let’s start with adding layout in the Shared folder. For adding layout right-click on a shared folder and select View from it.

After clicking on View from the above list, a new dialog will pop up for asking view name (You might be thinking why we are adding View for Layout because layout is basically a View.). Here we are adding view name as _layoutdemo.cshtml that would be like as shown below.
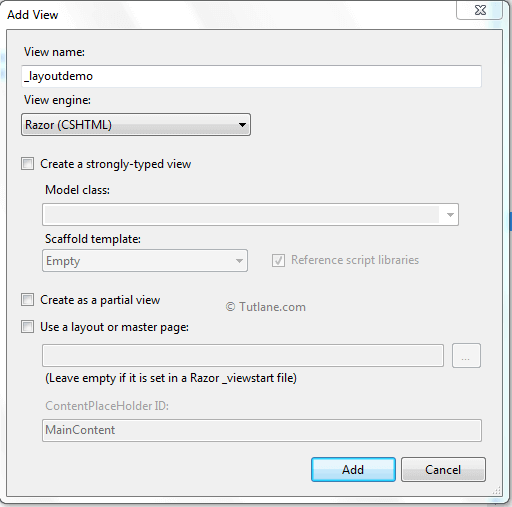
After giving the name, click on the Add button, our layout view (_layoutdemo.cshtml) will be created in a shared folder.

Now open our layout file(_layoutdemo.cshtml) that would contain code like as shown below.
@{
Layout = null;
}
<!DOCTYPE html>
<html>
<head>
<meta name="viewport" content="width=device-width"/>
<title>_layoutdemo </title>
<head>
<body>
<div>
</div>
</body>
</html>
Now let’s add RenderSection on Layout which we have created (_layoutdemo.cshtml). Generally RenderSection will be placed in our Layout like @RenderSection. Syntax of RenderSection like as shown below
@RenderSection(string name)
This RenderSection will render the named section's content and specifies whether the section is required or not, and RenderSection() is optional in the Layout view. Here we are adding a headers and footers section that would be like as shown below.
@RenderSection("headers")
@RenderSection("footers")
Once we add RenderSection in our layout page (_layoutdemo.cshtml) that will be like as shown below.
@{
Layout = null;
}
<!DOCTYPE html>
<html>
<head>
<meta name="viewport" content="width=device-width"/>
<title>_layoutdemo</title>
</head>
<body>
<table border="1px" style="width: 100%; text-align: center;">
<tr>
<td>
@RenderSection("headers")
</td>
</tr>
<tr>
<td style="height: 500px;">
@RenderBody()
// RenderBody
</td>
</tr>
<tr>
<td>
@RenderSection("footers")
</td>
</tr>
</table>
</body>
</html>
If you observe the above code, we have RenderBody() property. It works as ContentPlaceHolder that we use in asp.net webforms and render the child's portion that is not within a named section. The layout view must include the RenderBody() method.
After completion of adding RenderSections in Layout, we will add a Controller and View.
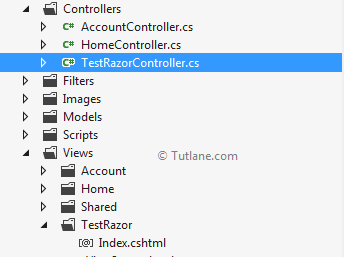
Let's start with adding Controller and naming it as TestRazorController for that right click on Controllers folder à select Add à click on controller à Give name as TestRazorController and select template as Empty MVC Controller and click add. Once our controller is created, that would be as shown below.
Now open a newly created controller that would contain code like as shown below.
using System;
using System.Collections.Generic;
using System.Linq;
using System.Web;
using System.Web.Mvc;
namespace Tutorial5.Controllers
{
public class TestRazorController : Controller
{
//
// GET: /TestRazor/
public ActionResult Index()
{
return View();
}
}
}
Now we will add a view for TestRazorController with name Index for that right click on controller à select Add View and give name as Index and click Add. Once we add view (Index.cshtml), that will be like as shown below.
@{
Layout = null;
}
<!DOCTYPE html>
<html>
<head>
<meta name="viewport" content="width=device-width"/>
<title>Index</title>
</head>
<body>
<div>
</div>
</body>
</html>Now let’s add Section in Index.cshtml. @section is for defining a content to override from a shared view. Here we will add 2 sections in this view one is Header and another one is Footer. Generally, our @Section syntax will be like, as shown below.
@section “Section name”
{
// content
}
Here, we need to define the Layout that we will use in our view, as shown below.
@{
Layout = "~/Views/Shared/_layoutdemo.cshtml";
}
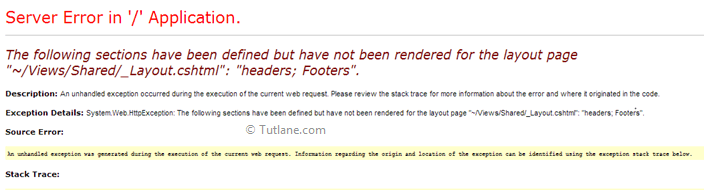
If we didn't define the Layout option, we would get an error like as shown below.
Once we add both header and footer sections and layout options, our view Index.cshtml will be shown below.
@{
Layout = "~/Views/Shared/_layoutdemo.cshtml";
}
<!DOCTYPE html>
<html>
<head>
<meta name="viewport" content="width=device-width"/>
<title>Index</title>
</head>
<body>
<div>
<table style="width: 100%">
<tr>
<td>
@section headers{
<h1>Header Content</h1>
}
</td>
</tr>
<tr>
<td>
@section Footers{
<h1>Footer Content</h1>
}
</td>
</tr>
</table>
</div>
</body>
</html>
Now lets Run Index page and check how our view look like that would be like as shown below.

This way, we can use Layouts in our asp.net mvc application.