In asp.net mvc Code First approach in entity framework is used to write POCO classes first, and according to that, the database will be created. We will learn the entity framework code first approach with a simple example in asp.net mvc.
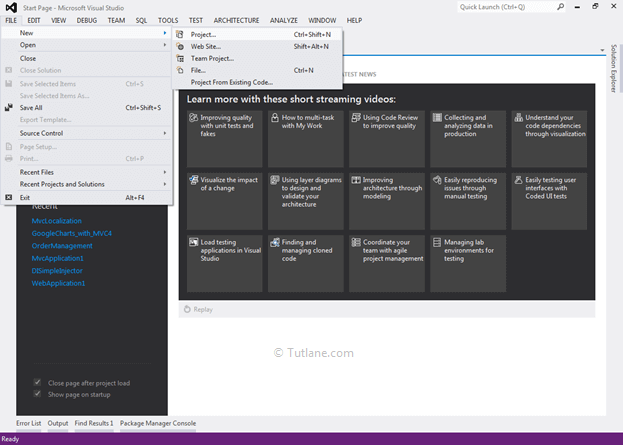
Let's start with creating a new asp.net mvc 4 application for that Open visual studio à Go to File à Select New à Select Project.
After that, you will see a new dialog for selecting your Template and Project type. From Templates, select Visual C# àinside that select Web and then project type select ASP.NET MVC 4 Web Application, and here we are giving the name as “MVCcodefirst” then finally click on ok button.

After naming it, click on OK, a new dialog will pop up to select a template. In that, select the Empty template and click ok like as shown below.

After selecting the Empty template, we are going to add the Entity framework.
For adding Entity framework, right-click on your application and from the list select “Manage NuGet Packages”. After selecting, a new dialog pop up for “Manage NuGet Packages” inside the search box, enter “Entityframework”. After getting the search value, select Entityframework click on the install button.

After adding, it will show an ok sign in green color.

After completing adding Entityframework, it’s time to add POCO Classes.
Now let’s add a POCO Classes (Plain old CLR object) and start defining your model requirement. To add POCO Classes, right-click on the Model folder à select Add à then select Class and Name the class as EmployeeDetails. Once we add the EmployeeDetails class file in the Model folder, our project structure is shown below.

Now open the EmployeeDetails class file and write the code, as shown below. Here if you observe, we used DataAnnotations (Key) to identify the entity uniquely.
using System;
using System.Collections.Generic;
using System.ComponentModel.DataAnnotations;
using System.Linq;
using System.Web;
namespace MVCCodefirst.Models
{
public class EmployeeDetails
{
[Key]
public int EmpID { get; set; }
public string Name { get; set; }
public string Address { get; set; }
public Nullable<int> Age { get; set; }
public Nullable<decimal> Salary { get; set; }
public string worktype { get; set; }
}
}
We will add a connection string in Web.config because we need to tell it where to create a Database that would be like as shown below.
<connectionStrings>
<add name="DefaultConnection" providerName="System.Data.SqlClient" connectionString="data source=sai-pc;
initial catalog=MVCCodeFirst; persist security info=True; user id=sa; password=#######; App=EntityFramework" />
</connectionStrings>
DefaultConnection - Connection string name we used above. Using this Code-first will create “MVCCodeFirst” as database name in the local sql server. You can give any unique name to database which ever you want to create.
Generally, DbContext is the primary class responsible for interacting with data as an object, including change tracking, persisting data, managing relationships, caching, and querying to the database. DbContext works as a bridge between your domain or entity classes and the database. Here we created a Class with Name “EmployeeDetailsContext” and folder structure after adding EmployeeDetailsContext class.

Our EmployeeDetailsContext file will contain code like as shown below.
using System;
using System.Collections.Generic;
using System.Data.Entity;
using System.Linq;
using System.Web;
namespace MVCCodefirst.Models
{
public class EmployeeDetailsContext
{
}
}
Now we will modify the EmployeeDetailsContext file by inheriting from DbContext class and included Dbset of Model name (EmployeeDetails) that will be like as shown below.
using System;
using System.Collections.Generic;
using System.Data.Entity;
using System.Linq;
using System.Web;
namespace MVCCodefirst.Models
{
public class EmployeeDetailsContext : DbContext
{
public EmployeeDetailsContext() : base("DefaultConnection")
{
}
public DbSet<EmployeeDetails> EmployeeDetails { get; set; }
}
}
Please find below details for properties, whatever we add in the above context file.
base("DefaultConnection") - Constructs a new context instance using the given string as the name or connection string for the database to which a connection will be made.
DefaultConnection - This is the name of the connection string that we have passed.
Lastly, we added the Dbset of Model name (EmployeeDetails), which we created in the Models folder.
public DbSet<EmployeeDetails> EmployeeDetails { get; set; }
If you are going to add more Model, you need to make a change in EmployeeDetailsContext class by adding more Dbset. Now let's test how it works. For that, we need to create a controller.
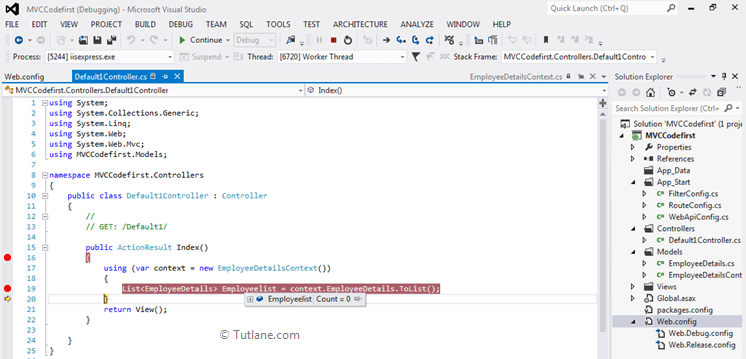
To add controller, right-click on Controller folder inside that select Add and then select Controller. After new pop up will open in that mention Controller name as "Default1Controller" and select template as "Empty MVC Controller," click Add. Once we add now open our controller from the folder and write the code like as shown below
using System;
using System.Collections.Generic;
using System.Linq;
using System.Web;
using System.Web.Mvc;
using MVCCodefirst.Models;
namespace MVCCodefirst.Controllers
{
public class Default1Controller : Controller
{
//
// GET: /Default1/
public ActionResult Index()
{
using (var context = new EmployeeDetailsContext())
{
List<EmployeeDetails> Employeelist = context.EmployeeDetails.ToList();
}
return View();
}
}
}
Now you can look at the Local SQL server. You will not find the MVCCodeFirst database once we run the application and access the Default controller. The Database will be created and will get you records from that database.
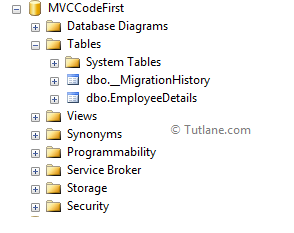
After that, it will query the database for getting records from Table EmployeeDetails below is the debug snapshot while getting data. It has got zero counts because we do not have records in that table.
This way, we will use the entity framework code first approach in asp.net mvc applications.