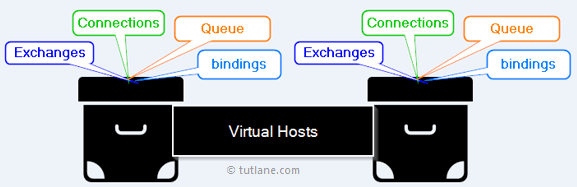
In rabbitmq, virtual hosts are like a virtual box which contains a logical grouping of connections, exchanges, queues, bindings, user permissions, policies and many more things.
Following is the pictorial representation of virtual hosts in rabbitmq.
In rabbitmq, we can create different virtual hosts and each virtual host will have users based on requirements.
To create a virtual host in rabbitmq, we need to login into rabbitmq web management portal with default credentials (guest) like as shown below.

Once login into web management portal, then choose admin tab. In admin section you will see vertical menus in the right part of the page, in that choose “Virtual Hosts” like as shown below.

After choosing “Virtual Hosts”, you will see the default “Virtual Hosts” which is already present or created. To create a new virtual host we have a panel called “Add a new virtual host”, just click on it to expand like as shown below.

After expanding the panel, you can see Name parameter here we are entering the name as “demohost”, next click on Add virtual host button to create “demohost” virtual host like as shown below.

After adding a virtual host, we can see the newly added virtual host in All virtual hosts panel like as shown below.

We are done with creation of virtual host but if we want to assign users to newly created virtual host, then we need to create users with required privileges and assign virtual host for that user. To know how to create users in rabbitmq check this, rabbitmq users.
Here, we are going to create a new user “virtualuser” by setting a password as “123456” and privilege as “administrator” (just click on Admin link, it will set “administrator” in tags field) like as shown below.

After creating the user, we can see the newly created user details in All users panel like as shown below. If you observe new user (“virtualuser”) details in grid, the “Can access virtual hosts” column has a value of “No access” which means the user doesn’t have the privilege to access any virtual hosts.

To set a permission for users to access virtual hosts, just click on the username which we have created “virtualuser” and go to Permissions panel which is just below the Overview panel and select required virtual host from dropdownlist and click on Set permission button like as shown below.

Here, the default value “.*” is used to allow user to access all exchanges and queues in the virtual host. Once the permission is set, you’ll see the “Current permission” like as shown below.

Now, the newly created user (“virtualuser”) has a permission to login into rabbitmq web management. Let’s login into rabbitmq web management plugin with new user “virtualuser” like as shown below.

Following is the snapshot after logging into rabbitmq web management plugin with new user “virtualuser”.
This is how we can create virtual hosts in rabbitmq and assign it to users based on our requirements.