In rabbitmq, Queue is a buffer that stores a messages that are sent from the exchanges to queues.

Now we will see how to create a queues in rabbitmq using web management portal. To create a queue in rabbitmq, open web management portal and enter a default credentials to login and then choose Queues tab.

After navigate to Queues tab, you will see “Add a new queue” just click on that panel to expand like as shown below.

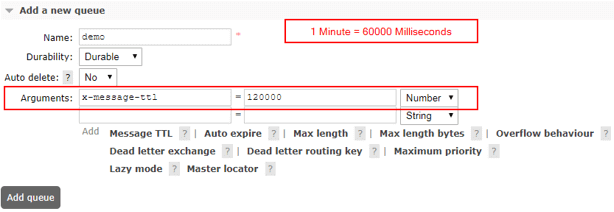
After clicking on Add a new queue option, a new panel will open and that will contain a different properties to create a new queue like as shown below.

If you observe above picture, to create a new queue in rabbitmq we need to enter a value for multiple parameters. Now we will see what is the necessity of each parameter in detail to create a queue in rabbitmq.
Following are the different type of properties which we need to enter to create a queue in rabbitmq.
It’s a name of the queue which we can use it to refer in our application. The name must be unique and it must not be any system define queue name.
Durability is a property of queue which tells that a message can survive even after server restarts (broker restart) or not.

There are 2 types of Durability options.
| Property | Description |
|---|---|
| Durable | If we mark queue as Durable, then it will survive even after server restarts. |
| Transient | If we mark exchange as Transient, then it will not survive after server restarts. |
There are 2 options in auto delete, those are
If queue is exclusive, then the durability attribute has no effect because the queue will be deleted as soon as client disconnects (or its connection is lost). The auto-deleted queues are deleted when the last consumer is canceled (or its channel is closed, or its connection is lost).
In rabbitmq, arguments are an optional and these are used by plugins and broker-specific features such as message TTL, queue length limit, etc.
Following are the different type of arguments which we can add based on our requirements.
By using time-to-live (ttl) argument, we can set a timespan to queue and it will be discarded if it reaches defined timespan. Here, we can set time in milliseconds.
By using auto expire argument, we can set an expiry time to queue and it is used to define how long a queue can be unused before it is automatically deleted.
Here unused means the queue has no consumers, the queue has not been re-declared, and basic.get method has not been invoked for a duration of at least the expiration period.

By using max length argument, we can define how many (ready) messages a queue can contain before it starts to drop them from its head.
A maximum number of messages can be set by supplying the x-max-length queue declaration argument with a non-negative integer value.

E.g. If you set value x-max-length = 2 and if you publish 3 messages in the queue, then only 2 messages will be there and the oldest will be deleted from the queue.

By using max length bytes argument, we can set total body size for ready messages a queue can contain before it starts to drop them from its head.
We can set Maximum length in bytes by supplying x-max-length-bytes queue declaration argument with a non-negative integer value.
E.g. If you set value x-max-length-bytes = 1000000 (1MB) and if you publish messages in queue and the queue size increase more than 1 MB then the oldest will be deleted from the queue (drop them from its head).

By using overflow behaviour argument, we can set the queue overflow behavior. This determines what happens to messages when the maximum length of a queue is reached. Valid values are drop-head or reject-publish.

By using dead letter exchange argument, we can set an optional name for exchange to which messages will be republished if they are rejected or expire.

Optional replacement routing key will be used when a message is dead-lettered. If this is not set, then the message's original routing key will be used.
For example, if you publish a message to an exchange with routing key foo, and that message is dead-lettered, then it will be published to its dead letter exchange with routing key foo. In case, if we declared a queue message with x-dead-letter-routing-key, then the message will be published to its dead letter exchange with routing key bar.

By using this argument, we can set a maximum number of priority levels for the queue to support. In case, if we didn’t set ("x-max-priority") argument, then the queue will not support message priorities.
To declare a priority queue, we need to use x-max-priority optional queue argument. This argument should be a positive integer between 1 and 255, indicating the maximum priority the queue should support.

By using lazy mode ("x-queue-mode") argument, we can set the queue into a lazy mode, keeping as many messages as possible on disk to reduce the RAM usage. In case, if it not set, then the queue will keep an in-memory cache to deliver messages as fast as possible.

By using master locator ("x-queue-master-locator") argument, we can set the queue into master location mode to determine the rule by which the queue master is located when declared on a cluster of nodes.
Finally, we are done with all the properties of queue. Now we will create a new queue for that enter queue name as “demoqueue” after that choose durability as a Durable and final option we are going set is auto delete to No and click on Add queue button to create a queue.

After creating a queue, you can view queue which you have recently added, it is located just above the add queue panel like as shown below.
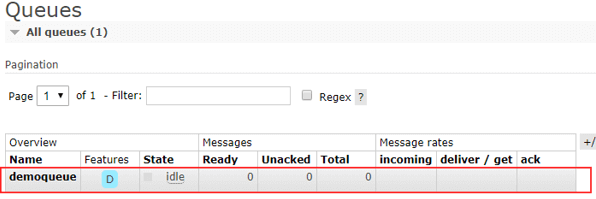
This is how we can create a queues in rabbitmq web portal based on our requirements.