In c#, we can publish or consume messages from rabbitmq by using RabbitMQ.Client nuget package. Here, we will learn how to publish a message to rabbitmq using RabbitMQ.Client service in c# or .net application with examples.
Let’s create a simple console application with the Name “RequestRabbitMQ” as shown below to publish messages to the rabbitmq queue.

After creating an application, now we will add the “RabbitMQ.Client” nuget package in our c# application to communicate with the rabbitmq server to publish or consume messages from queues in rabbitmq.
In c#, we need to add the “RabbitMQ.Client” nuget package in our application to communicate with the RabbitMQ server to publish or consume messages for that, right-click on your application and select Manage NuGet Packages as shown below.

Now search for RabbitMQ.Client package and install it in your application as shown below.

Following is another way to install RabbitMQ.Client package by using Package Manager Console as shown below by entering the following command.
Command to install - Install-Package RabbitMQ.Client -Version 5.1.0

Generally, when we publish a message to rabbitmq that will not directly send to the queue, instead first the message will be sent to exchanges, then after that, a routing agent reads and sends it to the appropriate queue with help of header attributes, bindings, and routing keys.
So, before we proceed first we need to create an exchange, queue and need to bind a queue to the exchange. We can create exchanges, queues, and bindings either directly from the rabbitmq web management portal or from c# applications using RabbitMQ.Client nuget package service.
To know how to create exchanges, queues, and bindings directly from the rabbitmq web management portal check the following articles.
In case, if you want to create rabbitmq exchange, queue, and bindings in c#, then we can do it by using RabbitMQ.Client service like as shown below.
To create a rabbitmq exchange in c#, first, we need to make a connection with the RabbitMQ server by using RabbitMQ.Client service with required credentials along with hostname.
Following is the example of creating an exchange in rabbitmq using c# programming language.
If you observe the above example, to establish a connection with the rabbitmq server we are passing the required credentials along with the HostName to ConnectionFactory() method. After that, we created a connection by calling the “CreateConnection” method and creating an exchange by calling the “ExchangeDeclare” method by passing parameters such as “exchange name” and “exchange type”.
When we execute the above c# program, we will get the result as shown below.

After executing the above program, the new exchange (demoExchange) will be created in the rabbitmq server. You can check the newly created exchange (demoExchange) details in the rabbitmq web management portal under the Exchanges tab as shown below.

Now, we will create a queue in rabbitmq using the c# programming language.
In c#, we can create a queue in rabbitmq by using the “QueueDeclare” method of RabbitMQ.Client service.
To create a queue in c#, we need to call the “QueueDeclare” method by passing the required parameters. Following is the definition of the rabbitmq QueueDeclare method in c#.

If you observe the QueueDeclare method, it accepts multiple parameters like queue name, durable, exclusive, autodelete, and arguments properties.
Following is the sample way of calling the QueueDeclare method to create a queue in rabbitmq using c# programming language.
Following is the example of creating a queue in rabbitmq using the c# programming language.
If you observe the above example, we are creating a queue (demoqueue) by using the QueueDeclare method in c# programming language.
When we execute the above c# program, we will get the result as shown below.

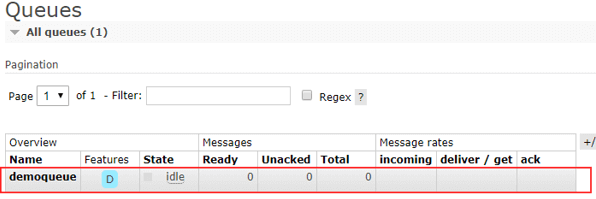
After executing the above program, the new queue (demoqueue) will be created in the rabbitmq server. You can check the newly created queue (demoqueue) details in the rabbitmq web management portal under the Queues tab as shown below.
After creating a queue and exchange, now we will bind the rabbitmq queue with exchange using c# programming language.
In c#, by using the QueueBind method we can bind a rabbitmq queue with the exchange by passing the name of the exchange, queue along with the routing key name.
To bind a queue with an exchange in c#, we need to call the “QueueBind” method by passing the required parameters. Following is the definition of the rabbitmq QueueBind method in c#.

If you observe the QueueBind method, it accepts multiple parameters like a model, queue name, exchange name, and routing key.
Following is the sample way of calling the QueueBind method to bind a rabbitmq queue with an exchange in c# programming language.
Following is the example of binding a rabbitmq queue with an exchange in c# programming language.
If you observe the above code, we are binding a rabbitmq queue (demoqueue) to exchange (demoExchange) with a routing key (directexchange_key) using the QueueBind method in c#.
When we execute the above c# program, we will get the result as shown below.

After executing the above program, the defined queue (demoqueue) will be bind to exchange (demoExchange) in the rabbitmq server. You can check the binding details of a queue (demoqueue) in the rabbitmq web management portal under the Bindings panel as shown below.

We are done with the creation of exchange, queue, and binding a queue to exchange in rabbitmq. Now, let’s publish a message to the rabbitmq queue (“demoqueue”) from a console application.
In c#, by using the BasicPublish method of RabbitMQ.Client service we can publish a messages to particular queue based on our requirements.
Following is the definition of the rabbitmq BasicPublish method in c#.

If you observe the BasicPublish method, it accepts multiple parameters like a model, exchange, routing key, properties, and required message to publish in the rabbitmq queue.
Following is the sample way of calling the BasicPublish method to publish a message to the rabbitmq queue in the c# programming language.
Following is the example of publishing a message to the rabbitmq queue in the c# programming language.
If you observe the above example, we are publishing a message (Direct Message) to the queue by passing required parameters like an exchange, routing key, properties, and message to the BasicPublish method.
When we execute the above c# program, we will get the result as shown below.

After executing the above program, if we check the queue (demoqueue) details in the rabbitmq web management portal, the Ready column is showing 1 as shown below which means the message was published successfully to demoqueue.
