Here we will learn what is tight coupling in asp.net mvc or model bound view in asp.net mvc and how to use tight coupling in asp.net mvc with example.
In asp.net mvc model bounded view is a tightly coupled, and it is used to create a view. Let’s create a Model bounded view or tightly coupled View in asp.net mvc application for that first we need to create Model, Controller, and View.
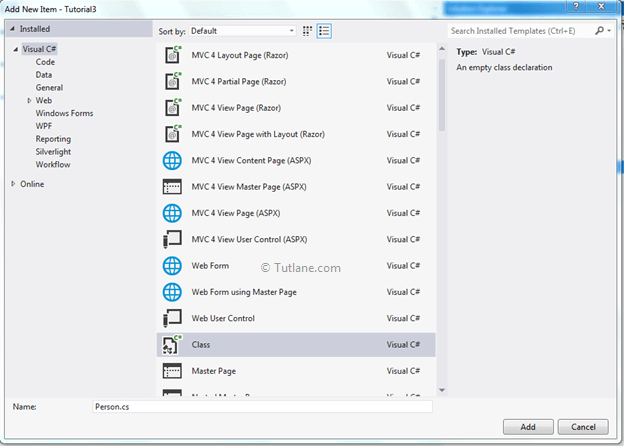
For adding Model Right click on Models folder à select Add à then select Class in asp.net mvc application. After that, a new Dialog (Add New Item) will popup asking you to enter the Class name in that enter name “Person” as shown below.
After adding the model, now let’s add some properties in this Person class like as shown following.
using System;
using System.Collections.Generic;
using System.Linq;
using System.Web;
namespace Tutorial3.Models
{
public class Person
{
public int ID { get; set; }
public string Name { get; set; }
public string Address { get; set; }
public string Mobileno { get; set; }
}
}
Now add a simple Controller with the name “PersonDetails” for that right-click on Controllers folder à select Add à Select Controller. Once we select Controller, a new popup will open in that mention name as “PersonDetails” and select the Empty MVC controller template and click on add after configuring it like as shown below.

After adding the controller, you can see the default code generated.
using System;
using System.Collections.Generic;
using System.Linq;
using System.Web;
using System.Web.Mvc;
namespace Tutorial3.Controllers
{
public class PersonDetailsController : Controller
{
//
// GET: /PersonDetails/
public ActionResult Index()
{
return View();
}
}
}
We will then change the controller method by adding the [HttpGet] attribute to Action Method and return a new instance Model Person like as shown below.
using System;
using System.Collections.Generic;
using System.Linq;
using System.Web;
using System.Web.Mvc;
using Tutorial3.Models;
namespace Tutorial3.Controllers
{
public class PersonDetailsController : Controller
{
//
// GET: /PersonDetails/
[HttpGet]
public ActionResult Index()
{
return View(new Person());
}
}
}
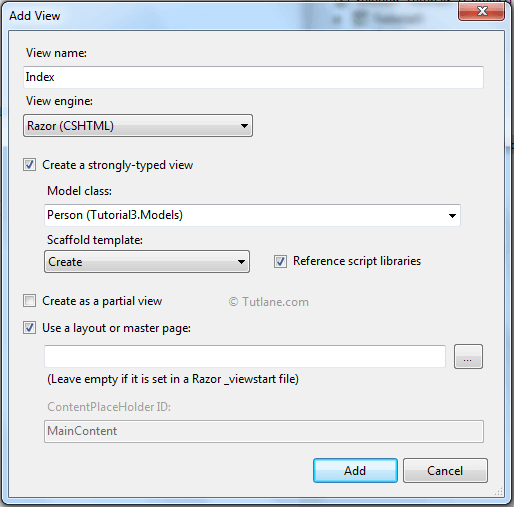
Now let’s add a view for that right-click inside the controller and select Add View you will get a pop up like as shown below. Inside the popup, you will see default View name will be there no need to change that, and we are going to use Razor engine that why we should select Razor engine. In the Model class, we are going to select the Person Model that we created. In the Scaffold template, select Create item and click on the Add button finally.
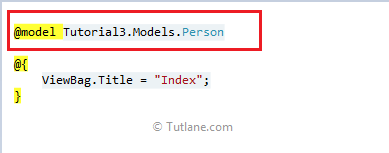
After clicking the Add button, our View will create that is tightly coupled to a model that would be like as shown below.
@model Tutorial3.Models.Person
@{
ViewBag.Title = "Index";
}
<h2>Index</h2>
@using (Html.BeginForm()) {
@Html.ValidationSummary(true)
<fieldset>
<legend>Person</legend>
<div class="editor-label">
@Html.LabelFor(model => model.Name)
</div>
<div class="editor-field">
@Html.EditorFor(model => model.Name)
@Html.ValidationMessageFor(model => model.Name)
</div>
<div class="editor-label">
@Html.LabelFor(model => model.Address)
</div>
<div class="editor-field">
@Html.EditorFor(model => model.Address)
@Html.ValidationMessageFor(model => model.Address)
</div>
<div class="editor-label">
@Html.LabelFor(model => model.Mobileno)
</div>
<div class="editor-field">
@Html.EditorFor(model => model.Mobileno)
@Html.ValidationMessageFor(model => model.Mobileno)
</div>
<p>
<input type="submit" value="Create"/>
</p>
</fieldset>
}
<div>
@Html.ActionLink("Back to List", "Index")
</div>
@section Scripts {
@Scripts.Render("~/bundles/jqueryval")
}
Here, the red mark border is showing the view is tightly coupled to the person Model.
This is how we can achieve a Model bounded view or tightly coupled view in asp.net MVC.